|
|
|
Categories
|
|
Information
|
|
Featured Product
|
|
|
 |
|
|
There are currently no product reviews.
 ;
The manual was exactly what I wanted and I found it nowhere else. Thanks!
;
Having purchased a 1994 Kenwood music system from a Charity shop in 2013 (it was a high end product in its day), I found myself not quite knowing where to plug in what, and how to do this, that and the next thing. I needed a Manual, and after failure with another online 'Manual provider' I found Owner Manuals dot com. Well, I wasn't sure, but it was only $5, and if things didn't work out, I wouldn't have lost much...
But things DID work out. After paying my childrens inheritance money, $4.99, I was sent a Manual for my Kenwood System very quickly. Alas, it was in German, and being Scottish, I could not read it or get my system in order from it...a rapid email to them brought the English Manual in short order, and my retro-system was and IS up and running in it's regulation settings.
I am very grateful to http://www.owner-manuals.com for their quick service and for even having such an obsolete Manual in the first place! If you need a Manual for ANYTHING, try here first. I wouldn't be surprised if I bought a 1928 Marconi radio, and got the user Manual for THAT here too!
Top marks.
John Copeland
Glasgow
Scotland
;
I was so happy that the owner's manual was available. It is well written and helped me to use the radio/CD player/recorder without problems. Thanks for making it available.
Irene Lambert
;
Excellant!!! Very quick and easy....Best $4.99 I have spent in a very long time..
I highly recommend this.
;
Thanks so much for the Owner's manual for my Sony PS - FL1. I had purchased the turntable off of eBay. It came in and looked great. Packed well and appeared to be great. I balanced and aligned the tone are and hooked it up. When trying to play a record the tone are would move to the right place and just before it would drop to play it moved back off the edge of the record before touching down. I searched the net for an answer to this issue. No luck. Then I purchased the owners manual and sure enough there was a place to adjust where the stylus touched down. That adjustment solved the problem and saved me a $35 feet to have the player checked out. The manual is well written and easy to understand. It is a must have for anyone with this front loading Sony turntable.
Operation
10
Loading Discs
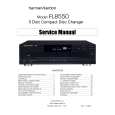
To load a disc, first turn the FL8550 on using the Power Switch 1. Note that the Status Mode Indicator 2 will turn green and the Information Display � will illuminate. The word disc will flash in the Information Display, and the disc tray will automatically turn clockwise so that the FL8550 can sense which, if any, of the disc positions already have a disc. To load a disc, first press the Open/Close button ! a, taking care to make certain that the space in front of the drawer is not obstructed. Note that if the drawer is blocked when attempting to open it, it will automatically close within five seconds to protect the mechanism. Load discs in the tray with the printed (label) side facing up towards you. Make certain that the disc is centered in the tray. Either 5" (12cm) or 3" (8cm) discs may be used. When a 3" (8cm) disc is played, it should be carefully centered within the smaller ridges on the tray. Only one CD may be placed in any position at a time. When a 3" (8cm) is played, DO NOT place a standard 5" (12cm) disc over the smaller disc.
Labeled surface
Note that each disc position has a number embossed in the plastic tray. This corresponds to the position this disc will occupy for playback and programming. To make it easier to identify each disc�s position, the disc position number for the holder space that is in the center of the disc tray will also appear in the Information Display when the disc drawer is open. To rotate the disc tray to another position, press the Disc Skip button * p. The tray will revolve clockwise to the next slot, and the Information Display will indicate the position number for the slot in the middle of the tray. To close the disc drawer, press the Open/ Close button ! a. When the drawer closes, the disc that was last in the center position on the tray will be readied for play. Its number will appear in the Information Display, and a flashing red line will surround the icon for that disc. The icons for all other tray positions that have a disc will be surrounded with a blue line. If the center disc position is empty when the drawer is closed, the unit will search for the next position with a disc loaded, and place that spot in the ready mode. The drawer may also be closed and the FL8550 put into play by pressing the Play button $ h. This will put the disc in the center position into the Play mode. To close the drawer and play a specific disc, press the Disc Select button ( b corresponding to the tray position number for the disc you wish to play. When the disc drawer closes, the Information Display will briefly display the disc number, the total number of tracks on the disc and the disc�s total
running time. After five seconds, the display will indicate the disc number that is in the play position, both by a flashing red line surrounding the disc�s icon and the wording in the display, such as disc 5. The total number of tracks on the disc will illuminate at the far right side of the display.
1
DISC
2
TRACK
3
4
MIN
5
SEC
11 12
12345 6 7 8 9 10
To remove a disc from the player, press the Open/Close button ! a. The drawer will open, allowing the discs to be removed. Press the Disc Skip button * p to rotate the disc carousel tray to reach discs that may be covered. When a disc does not occupy a numbered tray, and the sensor detects no disc present, the disc number will drop from the display. Upon placing a disc in the unoccupied tray, the disc number will reappear when detected by the sensor mechanism. Disc-Handling Notes When loading or unloading discs, it is best to hold them by the edges. While Compact Discs are very reliable, rough handling may damage them. Avoid scratching the bottom (non-printed) side of discs, or any handling that will leave fingerprints. To avoid damage to the disc and player, always seat discs so that they are centered in the tray. Do not lift the player while the disc tray is opening or closing, as this may cause the discs to unseat from the tray and possibly jam.
Recorded surface
|
|
|
> |
|